Tag: typescript

  • How to Configure Jest for TypeScript in React or NodeJS Projects

    How to Configure Jest for TypeScript in React or NodeJS Projects

    Setting up Jest for TypeScript testing in React and NodeJS can streamline your development workflow and ensure high-quality code. This guide provides an opinionated, step-by-step process for configuring Jest with TypeScript support, whether you’re working on new or existing projects.

    1. Install Jest and Its Friends (Dependencies)

    Start by installing the necessary Jest packages along with TypeScript support:

    # Using Yarn
    yarn add --dev jest ts-jest @types/jest
    
    # Or using npm
    npm install --save-dev jest ts-jest @types/jest
    • ts-jest: A TypeScript preprocessor that lets Jest handle .ts and .tsx (TypeScript files).
    • @types/jest: Provides type definitions for Jest in TypeScript.

    2. Configure Jest with the Preprocessor

    Generate a basic Jest configuration using ts-jest:

    npx ts-jest config:init

    This command generates a jest.config.js file with the following contents:

    module.exports = {
      preset: 'ts-jest',
      testEnvironment: 'node',
    };

    3. Customize Your Jest Configuration (Optional)

    For advanced setups, you can extend your configuration to include code coverage and improved testing workflows:

    module.exports = {
      roots: ['<rootDir>/src'],
      preset: 'ts-jest',
      testEnvironment: 'node',
      coverageDirectory: 'coverage',
      verbose: true,
      collectCoverage: true,
      coverageThreshold: {
        global: {
          branches: 90,
          functions: 95,
          lines: 95,
          statements: 90,
        },
      },
      collectCoverageFrom: ['**/*.{ts,tsx}'],
      coveragePathIgnorePatterns: ['/node_modules/'],
      coverageReporters: ['json', 'lcov', 'text', 'clover'],
    }; 

    This configuration adds:

    • Code coverage thresholds to ensure high-quality tests.
    • A custom coverage directory.
    • Inclusion of TypeScript, TSX, and JSX files.

    For more advanced configurations, check the official Jest documentation.

    4. Add Jest Test Scripts to package.json

    Add custom scripts for testing workflows in your package.json file:

    {
      "scripts": {
        "test": "jest --coverage",
        "test:watch": "jest --watchAll",
        "test:nocoverage": "jest --watchAll --no-coverage"
      }
    }

    These scripts provide:

    • test: Runs all tests with coverage reports.
    • test:watch: Watches for changes and re-runs tests automatically.
    • test:nocoverage: Faster test runs without generating coverage reports.

    Congratulations if you got this far. This is a one-off set-up; you would rip the benefits in days to come. Follow on to test your Jest configuration for testing your Typescript React or NodeJs project.

    5. Verify the Setup with a Simple Test

    Create a simple function and its corresponding test file to confirm everything is configured correctly.

    Function (sum.ts):

    const sum = (a: number, b: number): number => a + b;
    export default sum;

    Test (sum.test.ts):

    import sum from './sum';
    
    describe('Addition function', () => {
      test('adds 1 + 2 to equal 3', () => {
        expect(sum(1, 2)).toBe(3);
      });
    });

    Run the test:

    yarn test

    6. Advanced Testing Workflow with Coverage Reports

    After running your tests, generate coverage reports for better visibility into untested areas of your codebase.

    Commands

    yarn test               # Runs tests with coverage
    yarn test:watch         # Continuously watches and runs tests
    yarn test:watch:nocoverage  # Faster feedback without coverage
    yarn global add serve   # Install `serve` to view reports
    yarn view:coverage      # Open the coverage reports as a static site 

    Example Test Outputs

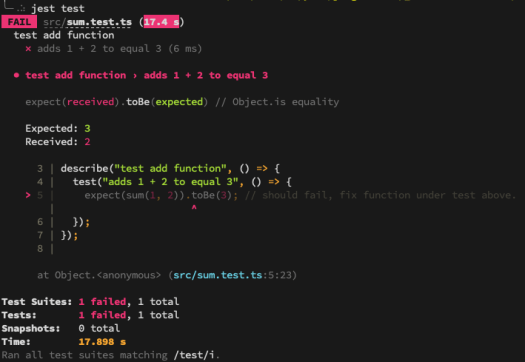
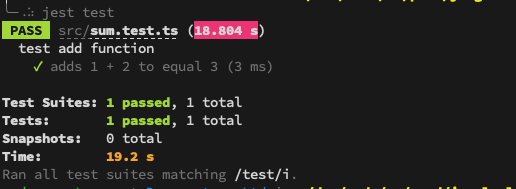
    When running yarn test, you may see:

    Failing Test Example:

    yarn test Example console output with failing test.

    Passing Test Example

    yarn test Example console output with passing test.

    Now, fix any failing tests, and re-run the commands until all tests pass successfully.

    Why This Setup is Worth It

    This one-time Jest configuration significantly speeds up your TypeScript testing workflow. With proper coverage thresholds, easy-to-run scripts, and a reliable test runner like Jest, you’ll save time while improving your project’s overall quality.

    If you would like additional guidance, please take a look at the official Jest configuration guide.

    Furthermore, you can configure your IDE to generate boilerplate code snippets using this guide: React Code Snippet Generators with IntelliJ Idea

  • TypeScript is Great, But Sometimes You Just Want Java

    TypeScript is Great, But Sometimes You Just Want Java

    TypeScript has become the de facto language for Angular development, and for good reason—it’s easy to learn, strongly typed, and less error-prone than JavaScript. But what if you prefer Java for its mature tooling, strong object-oriented features, and familiarity? Enter Angular2Boot—a framework built on Angular 2, GWT, and Spring Boot that lets you write Angular 2 apps in Java 8.

    This guide walks you through setting up and running an Angular 2 app in Java 8 using Angular2Boot.

    Why Angular2Boot?

    Angular2Boot bridges the gap between modern frontend development and Java’s robust backend ecosystem. It’s particularly useful for smaller applications where splitting the app into multiple tiers (WebClient, Service, Backend REST API) might feel like overkill.

    Key Benefits

    1. Stronger Typing: Java provides even stronger type-checking compared to TypeScript.
    2. Mature Tooling: Java offers tried-and-tested tools and IDEs for streamlined development.
    3. Simplified Deployment: Package everything into one Spring Boot jar for production-ready builds.
    4. Robustness: Java remains a go-to language for building scalable, enterprise-grade applications.

    Getting Started with Angular2Boot

    Step 1: Create the Project

    Generate an Angular and GWT app using Maven archetype:

    mvn archetype:generate 
      -DarchetypeGroupId=fr.lteconsulting 
      -DarchetypeArtifactId=angular2-gwt.archetype 
      -DarchetypeVersion=1.6 

    During the setup process, provide the following details:

    • Group ID: com.mosesmansaray.play
    • Artifact ID: angular-gwt-in-java8-example
    • Version: 1.0-SNAPSHOT
    • Package Name: com.mosesmansaray.play

    This will create a project scaffold with all the necessary dependencies and configurations.

    Step 2: Install Dependencies

    Build the project to install all required dependencies and produce an executable JAR file:

    mvn clean install

    The resulting JAR file will be located in your target folder:

    /angular-gwt-in-java8-example/target/angular-gwt-in-java8-example-1.0-SNAPSHOT.jar
    

    Step 3: Run the Application

    Run the fat JAR file to start your application:

    java -jar target/angular-gwt-in-java8-example-1.0-SNAPSHOT.jar
    

    Step 4: Development with Live Reload

    During development, you can enable live reload for both backend and frontend:

    Backend:

    mvn spring-boot:run

    Frontend:

    mvn gwt:run-codeserver

    This ensures a seamless development workflow with real-time updates.


    Resources for Further Exploration

    1. Library Source Code: Explore the codebase.
    2. GWT con 2016 Talk: Watch here
    3. Speaker Deck Slides: A great overview of Angular2Boot.
    4. Code Demos:

    Conclusion

    Angular2Boot allows developers to harness the power of Angular 2 while benefiting from Java’s strong typing, mature tooling, and simplified deployment. Brilliant for when you’re prototyping or building enterprise-grade systems, Angular2Boot bridges the gap between modern frontend frameworks and Java’s backend ecosystem.

    Try it and experience the best of both worlds! Let me know what you think.