Tag: Java

  • Log4J Zero-Day Exploit: Explained with Fixes

    Note: Check out my latest blog for updated information and solutions on this issue: Log4j 2.16.0 Fixes Critical Vulnerabilities: What You Need to Know

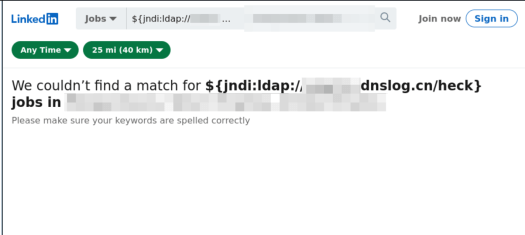
    The best evidence I have seen so far is that of a little bobby table LinkedIn exploit 🫣

    Overview: What Is the Log4J Zero-Day Exploit (CVE-2021-44228)?

    A critical zero-day exploit affecting the widely used Log4J library has been identified and fixed in version 2.15.0. This vulnerability (CVE-2021-44228) allows attackers to gain complete control of your server remotely—making it one of the most dangerous Java-based vulnerabilities to date.

    For details, visit the Apache Log4j Security Page. This isn’t just a Java developer’s headache—it’s a wake-up call for every engineer, security specialist, and even non-Java tech teams whose tools rely on Log4J indirectly (looking at you, Elasticsearch and Atlassian users).

    This post explains:

    1. How the exploit works.
    2. How to check if you’re affected.
    3. Step-by-step fixes to secure your applications.

    Quick Summary

    • Upgrade Log4J to version 2.15.0 or later immediately.
    • Workarounds exist for systems where upgrading isn’t feasible (see below).
    • Popular apps like Elasticsearch, Minecraft, and Jira are affected.

    Understanding the Exploit

    The vulnerability lies in log4j-core versions 2.0-beta9 to 2.14.1. When an application logs user inputs using Log4J, the exploit allows malicious actors to execute arbitrary code remotely. In practical terms, if your app takes user input and logs it, you’re at risk.

    Am I Affected?

    If your system runs Java and incorporates log4j-core, either directly or through dependencies, assume you’re affected. Use tools like Maven or Gradle to identify the versions in your project. Here’s how:

    For Gradle

    ./gradlew dependencies | grep "log4j"

    For Maven

    ./mvn dependency:tree | grep log4j

    Most Java applications log user inputs, making this a near-universal issue. Be proactive and investigate now.

    How to Fix the Log4J Vulnerability

    1. Upgrade Your Log4J Version

    The most reliable solution is upgrading to Log4J 2.15.0 or newer. Here’s how for common tools:

    Maven

    <properties>  <log4j2.version>2.15.0</log4j2.version> 
    </properties>

    Then verify the fix with

    ./mvn dependency:list | grep log4j

    Gradle

    implementation(platform("org.apache.logging.log4j:log4j-bom:2.15.0"))

    Then confirm the version fix with

    ./gradlew dependencyInsight --dependency log4j-core

    2. Workarounds If Upgrading Isn’t Feasible

    For systems running Log4J 2.10 or later, use these temporary fixes:

    Add the system property

    Dlog4j2.formatMsgNoLookups=true

    Set the environment variable

    LOG4J_FORMAT_MSG_NO_LOOKUPS=true

    For JVM-based apps, modify the launch command

    java -Dlog4j2.formatMsgNoLookups=true -jar myapplication.jar

    Applications Known to Be Affected

    Even if you’re not directly using Log4J, many popular tools and libraries depend on it. Here’s a (non-exhaustive) list of systems at risk:

    • Libraries: Spring Boot, Struts
    • Applications: Elasticsearch, Kafka, Solr, Jira, Confluence, Logstash, Minecraft
    • Servers: Steam, Apple iCloud

    If you’re using any of these, check their documentation for specific patches or updates.

    Final Reminder: Why This Matters

    Apache has rated this vulnerability as critical. Exploiting it allows remote attackers to execute arbitrary code as the server user, potentially with root access. Worm-like attacks that propagate automatically are possible.

    To stay secure:

    1. Upgrade or apply workarounds immediately.
    2. Regularly monitor the Apache Log4j Security Page for updates.

    Additional Resources

  • TypeScript is Great, But Sometimes You Just Want Java

    TypeScript is Great, But Sometimes You Just Want Java

    TypeScript has become the de facto language for Angular development, and for good reason—it’s easy to learn, strongly typed, and less error-prone than JavaScript. But what if you prefer Java for its mature tooling, strong object-oriented features, and familiarity? Enter Angular2Boot—a framework built on Angular 2, GWT, and Spring Boot that lets you write Angular 2 apps in Java 8.

    This guide walks you through setting up and running an Angular 2 app in Java 8 using Angular2Boot.

    Why Angular2Boot?

    Angular2Boot bridges the gap between modern frontend development and Java’s robust backend ecosystem. It’s particularly useful for smaller applications where splitting the app into multiple tiers (WebClient, Service, Backend REST API) might feel like overkill.

    Key Benefits

    1. Stronger Typing: Java provides even stronger type-checking compared to TypeScript.
    2. Mature Tooling: Java offers tried-and-tested tools and IDEs for streamlined development.
    3. Simplified Deployment: Package everything into one Spring Boot jar for production-ready builds.
    4. Robustness: Java remains a go-to language for building scalable, enterprise-grade applications.

    Getting Started with Angular2Boot

    Step 1: Create the Project

    Generate an Angular and GWT app using Maven archetype:

    mvn archetype:generate 
      -DarchetypeGroupId=fr.lteconsulting 
      -DarchetypeArtifactId=angular2-gwt.archetype 
      -DarchetypeVersion=1.6 

    During the setup process, provide the following details:

    • Group ID: com.mosesmansaray.play
    • Artifact ID: angular-gwt-in-java8-example
    • Version: 1.0-SNAPSHOT
    • Package Name: com.mosesmansaray.play

    This will create a project scaffold with all the necessary dependencies and configurations.

    Step 2: Install Dependencies

    Build the project to install all required dependencies and produce an executable JAR file:

    mvn clean install

    The resulting JAR file will be located in your target folder:

    /angular-gwt-in-java8-example/target/angular-gwt-in-java8-example-1.0-SNAPSHOT.jar
    

    Step 3: Run the Application

    Run the fat JAR file to start your application:

    java -jar target/angular-gwt-in-java8-example-1.0-SNAPSHOT.jar
    

    Step 4: Development with Live Reload

    During development, you can enable live reload for both backend and frontend:

    Backend:

    mvn spring-boot:run

    Frontend:

    mvn gwt:run-codeserver

    This ensures a seamless development workflow with real-time updates.


    Resources for Further Exploration

    1. Library Source Code: Explore the codebase.
    2. GWT con 2016 Talk: Watch here
    3. Speaker Deck Slides: A great overview of Angular2Boot.
    4. Code Demos:

    Conclusion

    Angular2Boot allows developers to harness the power of Angular 2 while benefiting from Java’s strong typing, mature tooling, and simplified deployment. Brilliant for when you’re prototyping or building enterprise-grade systems, Angular2Boot bridges the gap between modern frontend frameworks and Java’s backend ecosystem.

    Try it and experience the best of both worlds! Let me know what you think.

  • Lean Maven Release: The Maven Release Plugin on Steroids

    Lean Maven Release: The Maven Release Plugin on Steroids

    If you’ve ever been frustrated by the inefficiencies of the Maven Release Plugin—multiple builds, unnecessary commits, and endless waiting—you’re not alone. Enter the Lean Maven Release, a streamlined alternative to automate and optimize your Maven release process.

    This method eliminates repetitive steps, reduces build times, and minimizes interactions with SCM (Source Control Management). Let’s break it down.


    Why Choose Lean Maven Release?

    The Lean Maven Release strategy replaces the repetitive steps of the Maven Release Plugin with a more efficient, scriptable process. Instead of multiple check-ins to SCM and redundant builds, you can reduce the process to just four commands:

    mvn clean
    mvn versions:set
    mvn deploy
    mvn scm:tag 

    This approach can be set up in both Jenkins and TeamCity, saving hours for teams practicing Continuous Delivery or working in environments with frequent build requirements.

    Benefits of Lean Maven Release

    How much of an improvement can you expect? Let’s compare the two approaches:

    StepLean Maven ReleaseMaven Release Plugin
    Clean/Compile/Test Cycle13
    POM Transformations02
    SCM Commits02
    SCM Revisions1 (binary tag)3

    The difference is clear: Lean Maven Release significantly reduces overhead and complexity.


    Getting Started

    Here’s how to implement the Lean Maven Release process in your project:


    1. Add Required Maven Properties

    Ensure the necessary Maven plugin versions are defined in your pom.xml:

    <properties>
        <maven.compiler.plugin.version>3.1</maven.compiler.plugin.version>
        <maven.release.plugin.version>2.5</maven.release.plugin.version>
        <maven.source.plugin.version>2.2.1</maven.source.plugin.version>
        <maven.javadoc.plugin.version>2.9.1</maven.javadoc.plugin.version>
        <maven.gpg.plugin.version>1.5</maven.gpg.plugin.version>
    </properties> 

    2. Configure Deployment Paths

    Set up local or remote deployment paths in the <distributionManagement> section of your pom.xml:

    Local Deployment Example:

    <distributionManagement>
        <repository>
            <id>internal.repo</id>
            <name>Internal Repo</name>
            <url>file:///${user.home}/.m2/repository/internal.local</url>
        </repository>
    </distributionManagement> 
    <distributionManagement>
        <repository>
            <uniqueVersion>false</uniqueVersion>
            <id>corp1</id>
            <name>Corporate Repository</name>
            <url>scp://repo/maven2</url>
            <layout>default</layout>
        </repository>
    </distributionManagement> 

    3. Add Maven Plugins

    Add the necessary Maven plugins to your pom.xml:

    <build>
        <pluginManagement>
            <plugins>
                <plugin>
                    <groupId>org.apache.maven.plugins</groupId>
                    <artifactId>maven-compiler-plugin</artifactId>
                    <version>${maven.compiler.plugin.version}</version>
                </plugin>
                <plugin>
                    <groupId>org.apache.maven.plugins</groupId>
                    <artifactId>maven-release-plugin</artifactId>
                    <version>${maven.release.plugin.version}</version>
                    <configuration>
                        <useReleaseProfile>false</useReleaseProfile>
                        <releaseProfiles>release</releaseProfiles>
                        <goals>deploy</goals>
                    </configuration>
                </plugin>
                <plugin>
                    <groupId>org.apache.maven.plugins</groupId>
                    <artifactId>maven-source-plugin</artifactId>
                    <version>${maven.source.plugin.version}</version>
                </plugin>
                <plugin>
                    <groupId>org.apache.maven.plugins</groupId>
                    <artifactId>maven-javadoc-plugin</artifactId>
                    <version>${maven.javadoc.plugin.version}</version>
                </plugin>
                <plugin>
                    <groupId>org.apache.maven.plugins</groupId>
                    <artifactId>maven-gpg-plugin</artifactId>
                    <version>${maven.gpg.plugin.version}</version>
                </plugin>
            </plugins>
        </pluginManagement>
    </build> 

    4. Define the Release Profile

    Include a release profile to configure the Maven deployment process:

    <profiles>
        <profile>
            <id>release</id>
            <properties>
                <activatedProperties>release</activatedProperties>
            </properties>
            <build>
                <plugins>
                    <plugin>
                        <groupId>org.apache.maven.plugins</groupId>
                        <artifactId>maven-source-plugin</artifactId>
                        <executions>
                            <execution>
                                <id>attach-sources</id>
                                <goals>
                                    <goal>jar</goal>
                                </goals>
                            </execution>
                        </executions>
                    </plugin>
                    <plugin>
                        <groupId>org.apache.maven.plugins</groupId>
                        <artifactId>maven-javadoc-plugin</artifactId>
                        <executions>
                            <execution>
                                <id>attach-javadocs</id>
                                <goals>
                                    <goal>jar</goal>
                                </goals>
                            </execution>
                        </executions>
                    </plugin>
                </plugins>
            </build>
        </profile>
    </profiles> 

    5. Optional: Configure Assembly Plugin

    If required, add an assembly descriptor for packaging:

    <assembly>
        <id>plugin</id>
        <formats>
            <format>zip</format>
        </formats>
        <includeBaseDirectory>false</includeBaseDirectory>
        <dependencySets>
            <dependencySet>
                <outputDirectory>/</outputDirectory>
                <useProjectArtifact>true</useProjectArtifact>
                <useTransitiveFiltering>true</useTransitiveFiltering>
            </dependencySet>
        </dependencySets>
    </assembly> 

    6. Skip GPG Signing (Optional)

    If you don’t want to sign packages, you can skip the GPG plugin during deployment:

    mvn deploy -Prelease -Dgpg.skip=true 

    Conclusion

    This Lean Maven Release approach allows you to:

    • Eliminate unnecessary SCM interactions.
    • Reduce build times significantly.
    • Simplify deployment workflows.

    This method is ideal for teams practicing Continuous Delivery(CD) or dealing with frequent release cycles. For more details, check out Axel Fontaine’s blog post, which inspired this guide.

    Let me know what you think!

  • IntelliJ Tweaks: Hot Deploy/Swap to Servlet Server

    IntelliJ Tweaks: Hot Deploy/Swap to Servlet Server

    IntelliJ Tweaks: Hot Deploy/Swap to Servlet Server

    Hot deployment in IntelliJ IDEA allows developers to make changes to their code and immediately see the results on the Servlet Server without restarting the application. This tweak is a lifesaver for anyone working in a fast-paced development environment.

    Follow these simple steps to enable Hot Deploy and Hot Swap in IntelliJ IDEA.

    Steps to Enable Hot Deploy

    1. Update Debugger Settings

    Go to:

    File → Settings → Debugger → HotSwap
    • Enable class reload on the background: Set to true.
    • Enable class reload after compilations: Set to always.

    2. Configure Run/Debug Settings

    Update your Run/Debug Configuration:

    • In the “On frame deactivation” dropdown, select “Update resources.”

    Bonus: More Configuration Tips

    For advanced hot deployment scenarios, refer to this detailed guide on Hot Deployment with IntelliJ IDEA.

    Conclusion

    You’ll spend less time restarting your server and more time focusing on building your application after these IntelliJ tweaks. Hot deployment can significantly improve productivity, especially in projects where frequent updates are necessary.

    Try it out and let the rapid feedback loop supercharge your development workflow!