Tag: intelliJ

  • Boosting React Development with IntelliJ IDEA Code Snippets

    Boosting React Development with IntelliJ IDEA Code Snippets

    If you’re a fan of automation (and who isn’t?), IntelliJ IDEA’s code snippets are a game-changer for React development. As a Java developer diving into React, I’ve found these snippets invaluable for reducing typos, boilerplate, and the dreaded RSI (Repetitive Strain Injury). This guide walks you through generating React components using IntelliJ IDEA’s live templates, saving you time and effort.

    How to Generate Snippets in IntelliJ IDEA

    Before we go any further here is how to generate code snippet in IntelliJ Idea

    •  Simply type abbreviation name of the required snippet in the editor in the target file and press 
    • You can further narow the list suggestions by IntelliJ Idea by typing more characters of your abbrevation.

    Example: shortcuts to create snippets on Intellij Idea on a Mac:

    React Code Snippets Generator IntelliJ Idea
    1. Type ​`​rccp` in your editor
    2. Then press  to generate.

    Note:

    • Component name would be taken from the file name, example “ManageCoursePage.js”
    • For those on Visual Studio Code IDE the Code generation for React can be achieved with the Typescript React Code Snippet Extention

    React Code Snippet Examples

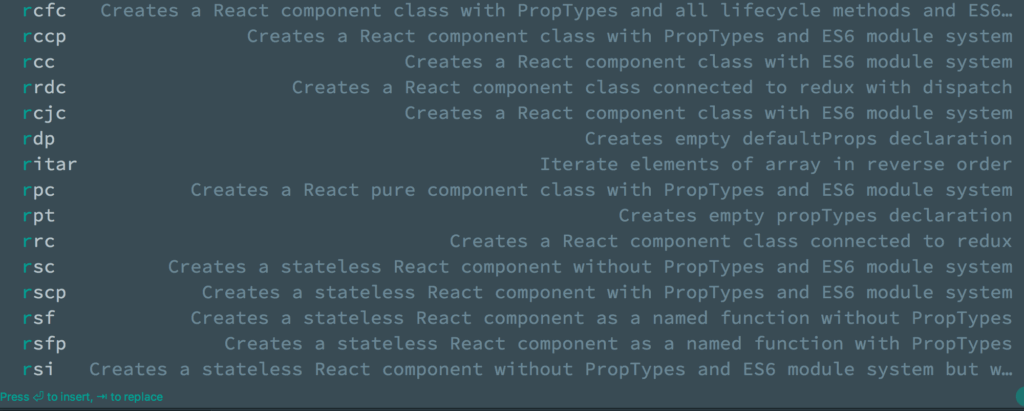
    1. React Component Class with PropTypes

    Abbreviation: rcp
    Steps:

    1. Type rcp in the editor.
    2. Press Tab to generate the snippet.

    Generated Snippet:

    import React, { Component } from 'react';
    import PropTypes from 'prop-types';
    
    class ManageCoursePage extends Component {
      render() {
        return <div>{/* Your code here */}</div>;
      }
    }
    
    ManageCoursePage.propTypes = {};
    export default ManageCoursePage; 

    2. React Component Class with ES6 Module System

    Abbreviation: rcc
    Steps:

    1. Type rcc in the editor.
    2. Press Tab to generate the snippet.

    Generated Snippet:

     import React, { Component } from 'react';
    
    class ManageCoursePage extends Component {
      render() {
        return <div>{/* Your code here */}</div>;
      }
    }
    
    export default ManageCoursePage;

    3. React Component Class Connected to Redux with Dispatch

    Abbreviation: rdc
    Steps:

    1. Type rdc in the editor.
    2. Press Tab to generate the snippet.

    Generated Snippet:

    import React, { Component } from 'react';
    import { connect } from 'react-redux';
    
    function mapStateToProps(state) {
      return {};
    }
    
    function mapDispatchToProps(dispatch) {
      return {};
    }
    
    class ManageCoursePage extends Component {
      render() {
        return <div>{/* Your code here */}</div>;
      }
    }
    
    export default connect(mapStateToProps, mapDispatchToProps)(ManageCoursePage); 

    4. React Component Class with PropTypes and Lifecycle Methods

    Abbreviation: rcfc
    Steps:

    1. Type rcfc in the editor.
    2. Press Tab to generate the snippet.

    Generated Snippet:

    import React, { Component } from 'react';
    import PropTypes from 'prop-types';
    
    class ManageCoursePage extends Component {
      constructor(props) {
        super(props);
      }
    
      componentWillMount() {}
    
      componentDidMount() {}
    
      componentWillReceiveProps(nextProps) {}
    
      shouldComponentUpdate(nextProps, nextState) {
        return true;
      }
    
      componentWillUpdate(nextProps, nextState) {}
    
      componentDidUpdate(prevProps, prevState) {}
    
      componentWillUnmount() {}
    
      render() {
        return <div>{/* Your code here */}</div>;
      }
    }
    
    ManageCoursePage.propTypes = {};
    export default ManageCoursePage; 

    Customising IntelliJ Snippets

    React Code Snippets Generator IntelliJ Idea Manage
    IntelliJ idea live template view

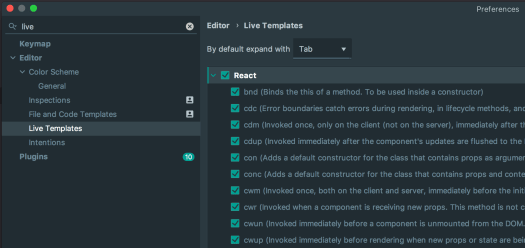
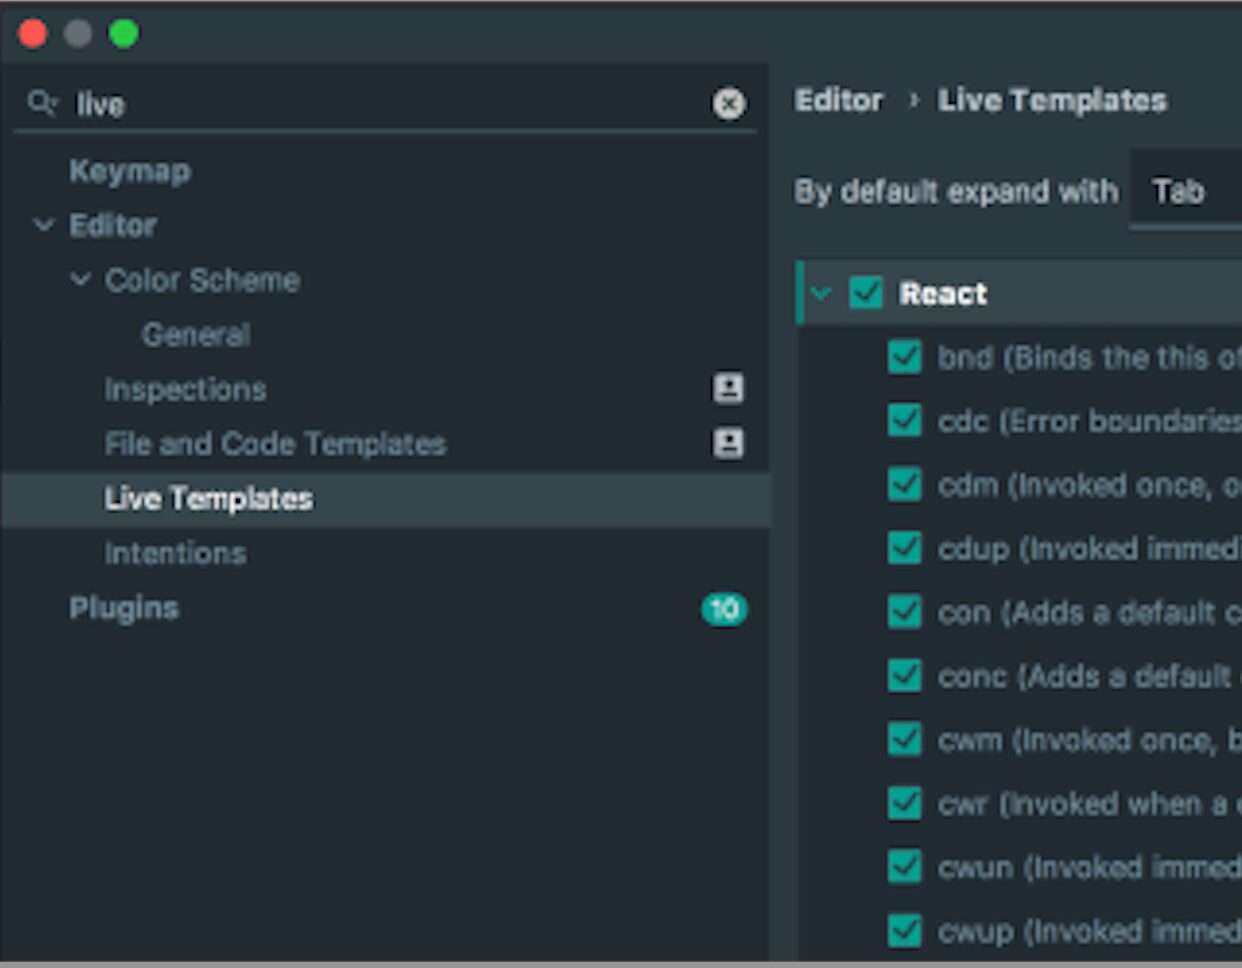
    To create or modify snippets in IntelliJ IDEA:

    1. Open Preferences > Editor > Live Templates.
    2. Add new templates or tweak existing ones to match your development style.

    These templates can also be shared across teams to maintain consistency and reduce onboarding time.

    Congratulations! You’ve successfully set up Jest for TypeScript testing in React and NodeJS and integrated IntelliJ IDEA to 10x your workflow. Now! No excuses not to follow a test-driven approach (TDD) and automated testing, which will eventually lead to faster development and more confidence in shipping more frequently

    Conclusion

    IntelliJ IDEA snippets are a fantastic way to save time and reduce errors when working with React. Whether you’re generating PropTypes, lifecycle methods, or Redux-connected components, these templates make development faster and less repetitive. Explore IntelliJ’s live template feature to customise your workflow and share these snippets with your team for maximum efficiency.

    For more automation tips, check out IntelliJ IDEA’s documentation on live templates.

    For more resources

  • Upgrading from JUnit 4 to JUnit 5 in Spring Boot Applications

    Upgrading from JUnit 4 to JUnit 5 in Spring Boot Applications

    Migrating from JUnit 4 to JUnit 5 (Jupiter) can feel daunting, especially if your project is built on older versions of Spring Boot. This guide breaks down the process step-by-step, helping you navigate dependency adjustments, IDE tweaks, and annotation replacements.

    Prerequisite: Spring Boot Compatibility

    Before starting, note that the SpringExtension required for JUnit 5 is only available starting from Spring 5. Unfortunately, spring-boot-starter-test 1.5.x is based on Spring 4, meaning JUnit 5 isn’t natively supported until you upgrade to Spring Boot 2.x or later.

    For more details, check:

    Step 1: Adjust Dependencies

    To use JUnit 5 in a Spring Boot project, you’ll need to exclude the default JUnit 4 dependency and explicitly add JUnit 5 dependencies.

    Current Dependency Configuration (JUnit 4)

    <dependency>
        <groupId>org.springframework.boot</groupId>
        <artifactId>spring-boot-starter-test</artifactId>
        <scope>test</scope>
    </dependency> 

    Updated Dependency Configuration (JUnit 5)

    Exclude JUnit 4 and add JUnit 5 dependencies:

    <dependency>
        <groupId>org.springframework.boot</groupId>
        <artifactId>spring-boot-starter-test</artifactId>
        <scope>test</scope>
        <exclusions>
            <exclusion>
                <groupId>junit</groupId>
                <artifactId>junit</artifactId>
            </exclusion>
        </exclusions>
    </dependency>
    <dependency>
        <groupId>org.junit.jupiter</groupId>
        <artifactId>junit-jupiter</artifactId>
        <scope>test</scope>
    </dependency> 

    Step 2: Update Imports

    With JUnit 5, most of the imports and annotations from JUnit 4 have been replaced. Use your IDE to quickly update these references.

    Global Find and Replace:

    1. Replace Imports
      • import org.junit.Test
        • import org.junit.jupiter.api.Test
      • import org.junit.runner.RunWith
        • import org.junit.jupiter.api.extension.ExtendWith
      • import org.springframework.test.context.junit4.SpringRunner
        • import org.springframework.test.context.junit.jupiter.SpringExtension
    2. Replace Annotations
      • @RunWith(SpringRunner.class)
        • @ExtendWith(SpringExtension.class)

    Step 3: Replace Annotations in Test Classes

    After updating imports, your test classes need to use JUnit 5’s new annotations.

    Before (JUnit 4)

    import org.junit.Test;
    import org.junit.runner.RunWith;
    import org.springframework.test.context.junit4.SpringRunner;
    
    @RunWith(SpringRunner.class)
    public class ExampleTest {
        @Test
        public void shouldPass() {
            // test logic
        }
    } 

    After (JUnit 5)

    import org.junit.jupiter.api.Test;
    import org.junit.jupiter.api.extension.ExtendWith;
    import org.springframework.test.context.junit.jupiter.SpringExtension;
    
    @ExtendWith(SpringExtension.class)
    public class ExampleTest {
        @Test
        public void shouldPass() {
            // test logic
        }
    } 

    Step 4: Use IDE Features for Dependency Updates

    adding Junit5 to the classpath

    If you’re using IntelliJ IDEA or similar IDEs, enable dependency management features to simplify updating your pom.xml. Use the following snippets if you prefer manual configuration:

    <dependency>
        <groupId>org.junit.jupiter</groupId>
        <artifactId>junit-jupiter-api</artifactId>
        <scope>test</scope>
    </dependency> 

    Why Upgrade to JUnit 5?

    JUnit 5 offers several advantages over JUnit 4, including:

    • Better modularity: You can use only the features you need.
    • New annotations: More flexibility with @BeforeEach, @AfterEach, and others.
    • Parameter injection: Cleaner test code through parameterized tests.

    Conclusion

    Upgrading from JUnit 4 to JUnit 5 in Spring Boot applications ensures your project stays up-to-date with modern testing frameworks. For more customisation, you can explore the official JUnit 5 documentation.

    Let me know how the migration process goes, and happy testing!