Every engineer’s secret weapon (or Achilles’ heel): tools and frameworks. This is where we break down the magic and madness of tech essentials—whether you’re trying to tame Kubernetes, optimise your Spring Boot setup, or decide if a new JavaScript framework is worth the hype. Spoiler: probably not
Apache Log4j 2.16.0 Is Now Available – Critical Update Required
A new follow-on vulnerability in Log4j has been discovered and fixed in version 2.16.0, addressing CVE-2021-44228 and CVE-2021-45046. If you’re still using version 2.15.0 or earlier, your applications may remain vulnerable in certain non-default configurations.
While version 2.15.0 addressed initial vulnerabilities, it left certain configurations exposed. Specifically, using the Thread Context value in the log message Pattern Layout could still allow exploitation. Version 2.16.0 eliminates this risk by fully removing the message lookup functionality.
Misleading Fixes to Avoid
Not all solutions floating around the community are effective. Avoid relying on the following:
Updating just the Java version.
Filtering vulnerabilities using Web Application Firewalls (WAF).
Modifying the log statement format to %m{nolookup}.
These approaches won’t fully mitigate the vulnerabilities, so upgrading to version 2.16.0 is your safest bet.
How to Stay Updated
The Log4j exploit has drawn global attention, leading to a flood of information—some of which may be inaccurate. For reliable updates, stick to trusted sources:
This is an evolving situation, and further updates may arise. Bookmark the Apache Security Page and regularly check for announcements to stay ahead of potential risks.
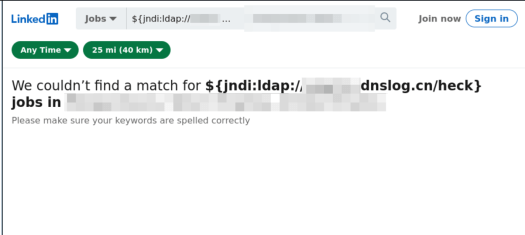
The best evidence I have seen so far is that of a little bobby table LinkedIn exploit 🫣
Overview: What Is the Log4J Zero-Day Exploit (CVE-2021-44228)?
A critical zero-day exploit affecting the widely used Log4J library has been identified and fixed in version 2.15.0. This vulnerability (CVE-2021-44228) allows attackers to gain complete control of your server remotely—making it one of the most dangerous Java-based vulnerabilities to date.
For details, visit the Apache Log4j Security Page. This isn’t just a Java developer’s headache—it’s a wake-up call for every engineer, security specialist, and even non-Java tech teams whose tools rely on Log4J indirectly (looking at you, Elasticsearch and Atlassian users).
This post explains:
How the exploit works.
How to check if you’re affected.
Step-by-step fixes to secure your applications.
Quick Summary
Upgrade Log4J to version 2.15.0 or later immediately.
Workarounds exist for systems where upgrading isn’t feasible (see below).
Popular apps like Elasticsearch, Minecraft, and Jira are affected.
Understanding the Exploit
The vulnerability lies in log4j-core versions 2.0-beta9 to 2.14.1. When an application logs user inputs using Log4J, the exploit allows malicious actors to execute arbitrary code remotely. In practical terms, if your app takes user input and logs it, you’re at risk.
Am I Affected?
If your system runs Java and incorporates log4j-core, either directly or through dependencies, assume you’re affected. Use tools like Maven or Gradle to identify the versions in your project. Here’s how:
For Gradle
./gradlew dependencies | grep "log4j"
For Maven
./mvn dependency:tree | grep log4j
Most Java applications log user inputs, making this a near-universal issue. Be proactive and investigate now.
How to Fix the Log4J Vulnerability
1. Upgrade Your Log4J Version
The most reliable solution is upgrading to Log4J 2.15.0 or newer. Here’s how for common tools:
If you’re using any of these, check their documentation for specific patches or updates.
Final Reminder: Why This Matters
Apache has rated this vulnerability as critical. Exploiting it allows remote attackers to execute arbitrary code as the server user, potentially with root access. Worm-like attacks that propagate automatically are possible.
Setting up Jest for TypeScript testing in React and NodeJS can streamline your development workflow and ensure high-quality code. This guide provides an opinionated, step-by-step process for configuring Jest with TypeScript support, whether you’re working on new or existing projects.
1. Install Jest and Its Friends (Dependencies)
Start by installing the necessary Jest packages along with TypeScript support:
# Using Yarn
yarn add --dev jest ts-jest @types/jest

# Or using npm
npm install --save-dev jest ts-jest @types/jest
ts-jest: A TypeScript preprocessor that lets Jest handle .ts and .tsx (TypeScript files).
@types/jest: Provides type definitions for Jest in TypeScript.
2. Configure Jest with the Preprocessor
Generate a basic Jest configuration using ts-jest:
npx ts-jest config:init
This command generates a jest.config.js file with the following contents:
test:watch: Watches for changes and re-runs tests automatically.
test:nocoverage: Faster test runs without generating coverage reports.
Congratulations if you got this far. This is a one-off set-up; you would rip the benefits in days to come. Follow on to test your Jest configuration for testing your Typescript React or NodeJs project.
5. Verify the Setup with a Simple Test
Create a simple function and its corresponding test file to confirm everything is configured correctly.
Function (sum.ts):
const sum = (a: number, b: number): number => a + b;
export default sum;
Test (sum.test.ts):
import sum from './sum';

describe('Addition function', () => {
  test('adds 1 + 2 to equal 3', () => {
    expect(sum(1, 2)).toBe(3);
  });
});
Run the test:
yarn test
6. Advanced Testing Workflow with Coverage Reports
After running your tests, generate coverage reports for better visibility into untested areas of your codebase.
Commands
yarn test               # Runs tests with coverage
yarn test:watch         # Continuously watches and runs tests
yarn test:watch:nocoverage  # Faster feedback without coverage
yarn global add serve   # Install `serve` to view reports
yarn view:coverage      # Open the coverage reports as a static site
Example Test Outputs
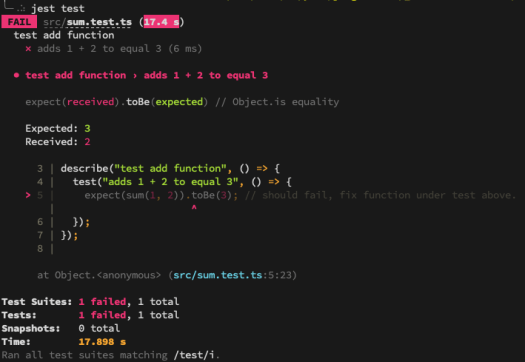
When running yarn test, you may see:
Failing Test Example:
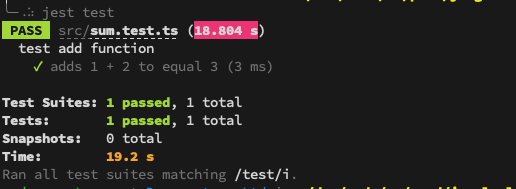
Passing Test Example
Now, fix any failing tests, and re-run the commands until all tests pass successfully.
Why This Setup is Worth It
This one-time Jest configuration significantly speeds up your TypeScript testing workflow. With proper coverage thresholds, easy-to-run scripts, and a reliable test runner like Jest, you’ll save time while improving your project’s overall quality.
If you would like additional guidance, please take a look at the official Jest configuration guide.
TypeScript has become the de facto language for Angular development, and for good reason—it’s easy to learn, strongly typed, and less error-prone than JavaScript. But what if you prefer Java for its mature tooling, strong object-oriented features, and familiarity? Enter Angular2Boot—a framework built on Angular 2, GWT, and Spring Boot that lets you write Angular 2 apps in Java 8.
This guide walks you through setting up and running an Angular 2 app in Java 8 using Angular2Boot.
Why Angular2Boot?
Angular2Boot bridges the gap between modern frontend development and Java’s robust backend ecosystem. It’s particularly useful for smaller applications where splitting the app into multiple tiers (WebClient, Service, Backend REST API) might feel like overkill.
Key Benefits
Stronger Typing: Java provides even stronger type-checking compared to TypeScript.
Mature Tooling: Java offers tried-and-tested tools and IDEs for streamlined development.
Simplified Deployment: Package everything into one Spring Boot jar for production-ready builds.
Robustness: Java remains a go-to language for building scalable, enterprise-grade applications.
Getting Started with Angular2Boot
Step 1: Create the Project
Generate an Angular and GWT app using Maven archetype:
Angular2Boot allows developers to harness the power of Angular 2 while benefiting from Java’s strong typing, mature tooling, and simplified deployment. Brilliant for when you’re prototyping or building enterprise-grade systems, Angular2Boot bridges the gap between modern frontend frameworks and Java’s backend ecosystem.
Try it and experience the best of both worlds! Let me know what you think.
By now, we’ve all seen this coming. With MongoDB falling victim to ransomware attacks, other NoSQL technologies like Elasticsearch were bound to follow. The alarming truth? Many Elasticsearch clusters are still open to the internet, vulnerable to attackers exploiting weak security practices, default configurations, and exposed ports.
This guide covers essential steps to protect your Elasticsearch cluster from becoming the next target.
TL;DR: Essential Security Measures
Use X-Pack Security: If possible, implement Elastic’s built-in security features.
Do Not Expose Your Cluster to the Internet: Keep your cluster isolated from public access.
Avoid Default Configurations: Change default ports and settings to reduce predictability.
Disable HTTP Access: If not required, disable HTTP access to limit attack vectors.
Use a Firewall or Reverse Proxy: Implement security layers like Nginx, VPN, or firewalls (example Nginx config).
Disable Scripts: Turn off scripting unless absolutely necessary.
Regular Backups: Use tools like Curator to back up your data regularly.
The Ransomware Playbook
Ransomware attackers are targeting Elasticsearch clusters, wiping out data, and leaving ransom notes like this:
“Send 0.2 BTC (bitcoin) to this wallet xxxxxxxxxxxxxx234235xxxxxx343xxxx if you want to recover your database! Send your service IP to this email after payment: xxxxxxx@xxxxxxx.org.”
Their method is straightforward:
Target: Internet-facing clusters with poor configurations.
Exploit: Clusters with no authentication, default ports, and exposed HTTP.
Action: Wipe the cluster clean and demand payment.
Why Are Clusters Vulnerable?
Many Elasticsearch admins overlook basic security practices, leaving clusters open to the internet without authentication or firewall protection. Even clusters with security measures are often left with weak passwords, exposed ports, and unnecessary HTTP enabled.
The lesson? Default settings are dangerous. Attackers are actively scanning for such vulnerabilities.
How to Protect Your Elasticsearch Cluster
1. Use Elastic’s X-Pack Security
X-Pack, Elastic’s security plugin, provides out-of-the-box protection with features like:
User authentication and role-based access control (RBAC).
Encrypted communication.
Audit logging.
If you’re using Elastic Cloud, these protections are enabled by default.
2. Avoid Exposing Your Cluster to the Internet
Isolate your cluster from public access:
Use private IPs or a Virtual Private Network (VPN).
Block all inbound traffic except trusted sources.
3. Change Default Ports and Configurations
Avoid predictability by changing Elasticsearch’s default port (9200) and disabling unnecessary features like HTTP if they aren’t required.
4. Implement Firewalls and Reverse Proxies
Add security layers between your cluster and potential attackers:
Configure firewall rules to allow only trusted IPs.
5. Disable Scripting
Unless absolutely necessary, disable Elasticsearch’s scripting capabilities to minimize attack surfaces. You can disable scripts in the elasticsearch.yml configuration file:
script.allowed_types: none
6. Regular Backups with Curator
Data loss is inevitable without backups. Use tools like Elasticsearch Curator to regularly back up your data. Store snapshots in a secure, offsite location.
Elasticsearch ransomware attacks are a stark reminder of the importance of proactive security measures. Whether you’re hosting your cluster on Elastic Cloud or self-managing it, adopting the security best practices outlined here will safeguard your data from malicious actors.
Remember:
Change default configurations.
Isolate your cluster from the internet.
Regularly back up your data.
If your Elasticsearch cluster is unprotected, the time to act is now—don’t wait until it’s too late.